Friday, June 28, 2013

The Traveling Stash Revisited

The Traveling Stash has made another stop at my house. 
It was sent to me by Ella of Throw a Wench in the Works.
 
 
From the stash I have taken a few fat quarters, a yard of batik, a yard of
patriotic fabric, and an Aunt Martha's lone star kit.


Here's what's left after my pilfering...lots of interesting miscellany.


And into it I'm adding a charm pack, some fabric and patterns, two packages of
quilt binding and Sue Daley's DVD "Learn English Paper Piecing." 
I'll also add more fabric to the stash till the box is full.
 
 
Sue's DVD is AWESOME and that alone is worth putting your name in the hat to get the stash next.  My hope is that as each person wins, they'll watch and enjoy the DVD and then put it back in the box for the next person to watch and pass along.  If that doesn't happen, it's okay because I'll never know.
 
 
So do you want a shot at receiving the Traveling Stash? 
Here are the rules (copied and pasted from Ella)...
 
The RULES
  •  Be an active blogger--post about receiving the box and the giveaway in a timely manner.
  • Update the travel log in the box to let others know where the box has been.
  • There is a list of rules and guidelines in the box.  (To keep items in the box quality!)
  • You may take any items from the box, just be sure that you are replacing them with quality and comparable items.
  • Ship the box to the next person timely--and communicate tracking info with recipient.
  • Shipping is within the US only.  (It's a med. flat rate priority box.)
 
 
So if you meet the criteria for this giveaway and want a chance to participate,
simply leave me a comment on this post by Monday, July 1.  I'll select a winner
and post their name Monday morning-ish.
 
That's all for now.  Good luck to everyone!

Thursday, June 13, 2013

Let's Talk Hexies...a Fussy Cutting Tutorial

A couple weeks back I was talking with a new friend of mine about how I fussy cut shapes for making hexagon flowers.  When I told her how I did it, she said that she had never thought to do it that way.  And that surprised me.

Later I was thinking about what my friend had said and it occurred to me that I don't know ANYONE that fussy cuts the way I do...that has blogged about it anyway.  An online search for "fussy cutting shapes for English Paper Piecing" turned up different ways...but not my way. 

What way you ask?  That is what I am about to share with you.

Here's what you need:


  • Fabric...usually a 1/4 yd is plenty but sometimes you can get away with an 1/8 yd
  • Desired paper shapes...for this tutorial I'm doing hexagons
  • Sewline Glue Stick
  • And small scissors
That's it!  No little plastic templates...no laying one cut shape onto top of another to match...none of that stuff.

It's just you and your light box...and some glue.

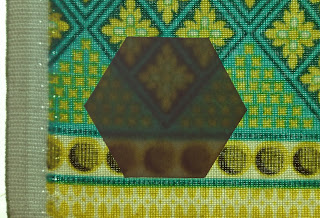
To begin lay your fabric face down on your light box and turn on the box.  Now you can lay your hexi shapes over the different motifs in the fabric to see how they'll look when made.  As you can see from the pictures below, you can easily see through the papers to select just the right motif.


Once you've selected the motif you wish to cut out, it's time to use your glue stick.  Swipe a small dab of glue to the center of your hexi shape and position it over the desired motif and press in place.  .


Repeat the process with the other five hexies, making sure to place them in the same position each time.  When doing this, pay special attention to what the corners are matching up to and make sure to do it exactly the same way with each hexi.

The next step is to cut out your shapes with your scissors leaving around the shape to turn.  A 1/4" is sufficient but you can get away with a little less if you have to.


The last thing you need to do is turn the edges for EPP.  Using your glue stick again, light swipe the edge of your glue stick across the paper and turn the edge.  You don't need a lot of glue to turn the edges.  So do not to use the flat end of the glue stick...just the edge.


TIP:  if you find that too much glue is coming off on the paper or getting
kinda "globby", stick it in the freezer for a few minutes.  Trust me...it'll help.


Once your hexies are prepped, you can now play with their placement and select a fabric for the flower's center.  Here is my first layout...


...and here is my final layout.


Usually when I'm working on hexies, I like to do several at the same time.  Here are some others I did yesterday while working on this tutorial. 


 And they became these...


I hope y'all enjoyed this and found it helpful.  I also hope that it wasn't old news!  If you have a way that you think is easier I'd love to hear about it.

And if you decide to do it this way, let me know how it went. 

Till next time...

Friday, June 7, 2013

I always end up staying away so long that...

...I avoid posting because I don't know where to start and what to share.  I hope I'm not the only person on the planet that does this.  Procrastination sure is a b*&$#.

Admittedly I haven't been working on a whole lot...kinda being lazy really.  With no job and all day to quilt, I should be getting TONS more done.  My husband has tried to convince me that it's okay to not quilt all the time.  But somehow I can't wrap my brain around that...hahahaha...men. 

I really do feel guilty if I sit down to quilt and don't accomplish anything.  Again...I hope I'm not alone here.  Do I feel guilty if I put off housework for a day or two or more?  Hmm...not so much.  Probably because I don't enjoy housework like I enjoy quilting. 

Maybe I'm missing my longarm machine.  I've been bit by the bug and really been itching to use it but it hasn't been set up yet.  Yeah...I know!  It should have been the first thing dealt with.  Right?  We don't know need kitchen stuffus and unpacked clothes to wear.  That's what WalMart and fast food are for...lol.

Anyway...enough "brain leak" rambling.  Back to what I've been up to. 

What I haven't been up to is my pineapple blocks.  I'm just bored with them and then moved onto pickles.  Here they sit in a box.  The pieces are cut, separated into little bags, and ready to go.  Yet I can't get myself to work on it.  Maybe it's because the realization of how long it's going to take me to tear out the paper has hit me...don't know.  I need a kick in the pants!


On to pickles...since my last post I hit a bump in the road and immediately stopped.  Yes...I'm hanging my head is shame.  Here are four completed blocks.

 
I completed enough arcs for 16 blocks and then began to put all the bits and pieces together.  The reason I have stopped you wonder.  I didn't like the way I was pressing the blocks.  So I need to rip out stitches and press them differently...seriously not looking forward to that...nope, not at all.
 
 
So I moved on to a couple UFOs.  They were once WIPs.  But at a certain point a WIP's shelf life expires and they become a UFO.  Anyone know how long the shelf life of a WIP is?  Because I'm afraid all my WIPs have expired and become UFOs...ugh.
 
 
UFO #1 - started in 2006
 
 
The top is done!  I had only three of the stars in the corner to go and I don't know why I stopped.  But its done now and can be added to growing pile of quilt tops that desperately need to be quilted.  Let's not talk about that today because that's a whole other can of worms...again...ugh.
 
 
UFO #2 - not as old as #1 (I could go back through my blog for a date but...)
 
 
My first Double Wedding Ring!  Yeah it's only four blocks but it DONE.  I had gotten the arcs done and didn't know where to go from there.  So I just stopped.  I came across it the other day while unpacking and decided to it was time to finish. 
 
After watching a couple videos on YouTube I was ready to go.  And you know what?  It went together pretty smoothly.  A little time consuming?  Yes...but really not that bad.  I enjoyed it enough to want to do a larger one soon.
 
 
Lastly, as of yesterday I am back to working on my traditional Cathedral Window table runner.  Right now I'm tacking the corners by hand.  I had considered doing it by machine but decided that it would've been more trouble than it was worth.  Doing the tacking is an incredibly boring task...but a necessary one. 
 
 
Here's a shot of entire runner.  As you can see I am about half way done with the tacking and then I get to play with color placement. 

 
I'm still trying to decide if I'm going to hand or machine finish each window.  Doing it by machine would be much easier but doing it by hand would be more "authentic" for lack of a better word.  Another thing to consider is that it'd get finished sooner if I did it by machine.  By hand would be anyone's guess.
 
 
To end this post, I put forth a question...one which I am sure I've asked before.  When it comes to giveaways, which ones are your favorites?  Books?  Fabric? Patterns?  Notions? Kits?  Handmade items maybe?
 
The reason I ask is that I recently noticed that I hit 501 followers.  That may not seem like a big deal to some but it is to me.  The fact that there are people interested in following what I'm doing...and not doing...let's be honest...means a lot to me.  I know that I am REALLY bad at responding to comments in a timely manner but know that I read each and every one of them and respond to them in my head.  Anyone know a good therapist?  LOL
 
As my way of saying thank you I want to do a giveaway.  I was thinking maybe a small precut Double Wedding Ring kit or something along that line.  Maybe even a Rob Peter to Pay Paul kit.
 
Any thoughts and ideas you share is greatly appreciated!
 
 
P.S.  Sorry for the wordy post.  I guess I had to more to say that I thought.